AppScan Usage
What: AppScan Standard is a webapp vulnerability scanner. A Windows desktop application from HCL (divested by IBM in 2019) Other versions of AppScan (which we don’t have) are “AppScan on Cloud (ASOC)” and “AppScan Enterprise” and “AppScan Source” (formerly Fortify)
Where: Two instances in Azure as of June, 2021.
- See LastPass “AppScan on Azure” for locations & credentials.
- Hostnames and public IPs:
- as1.s1hb.com (public IP: 52.170.190.136)
- as2.s1hb.com (public IP: 52.149.161.23)
How: Keep reading. Words come first. Screenshots follow.
Warnings
AppScan is different. It’s easier to get a far more thorough scan with AppScan than with Acunetix or Burp Suite. This comes with some maybe-not-obvious risks.
- Two of the biggest risks are:
- It’s very easy to get yourself or BHIS in actual trouble by accidentally scanning things that are not in scope.
- It’s more likely to damage a webapp than other scanners I’ve used.
- For apps that show user-entered content, you WILL see a bunch of attack strings on those pages, which is a Bad Thing perception-wise for production applications. If any of the attacks were even partially successful, this can break how the pages are rendered, making the app unusable. Any scanner can do this, of course, but I’ve seen AppScan do it “better” than other scanners.
- You can minimize this in two ways:
- Do a “manual explore” and don’t submit the forms you’re worried about, then do a “test only”. (This is general advice: ALWAYS do a “manual explore” and a “test only” so you control what gets tested.)
- Set up the “Exclude Paths and Files” so that the form you’re worried about is in the exclusion list. You can do this after exploring and before “test”-ing by right-clicking on the resource in question in the sitemap and choosing “exclude”
Two key mitigations, then:
- Check the scope in your AppScan config carefully before you start running the test, and verify that the sitemap it generates before you start the “testing” phase only includes things you want to attack.
- Warn the customer that if the app has injection-type vulnerabilities (even “just” HTML injection) the scan could make the app unusable by breaking the HTML it renders.
- Ask the customer to take a snapshot of the region you’re testing in before the scan begins, so they can restore it afterwards. If you’re testing in production - maybe don’t use AppScan there until you’re more comfortable with it, or ask bbking to help with the setup.
- Use a different set of webapp creds in AppScan than for the rest of your testing, just so one doesn’t mess you up in the other.
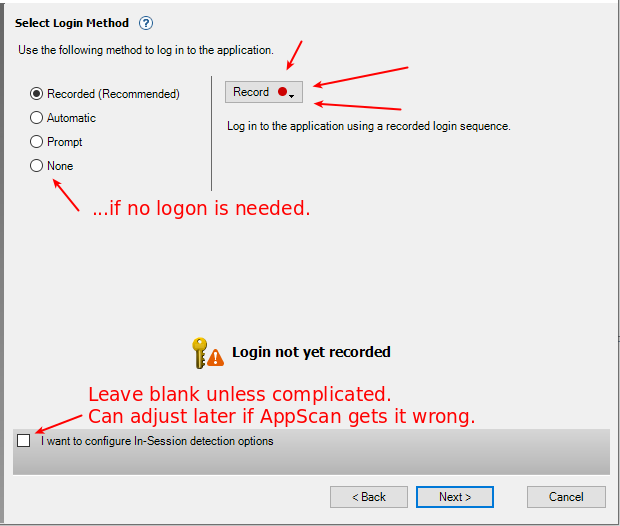
Key Concept: In-Session Detection
During an authenticated scan, AppScan checks regularly to make sure it is still logged-in. If it finds that it is not logged in, then it tries to log in again. If the login fails after 5 attempts, the scan will be suspended and will stop. If the login succeeds, AppScan will go back to the most recent test it ran when it knew it was logged in, and resume with the first test it can’t be sure of.
In-Session Detection depends on two things: a valid login sequence, and an “in-session page” (and pattern on that page).
The login sequence is what it sounds like. You can just give AppScan a username and password and tell it to use “Automatic Logon,” and for very simple forms-based logins that can be fine. Recording a login sequence, though, works in more situations.
An “in-session page” is one where the HTTP response when you’re logged in is different from when you’re not logged in. You tell AppScan what “pattern” (regex or string) in the response indicates that the user is logged in. The phrase “log out” is an obvious candidate for this, and is part of the default pattern AppScan uses.
During login, the scan needs to know which parameters are “tracked” and which are static. “Tracked” parameters are ones where AppScan uses the then-current value while it’s running. For “static” ones, AppScan uses the value that’s part of the recorded login sequence. Examples may be better:
- Your username is a “static” parameter.
- The session cookie is a “tracked” one.
- You may need to track others, too.
Failing to “track” a parameter whose value is part of the application’s authentication or authorization logic is the most common cause of in-session detection problems.
How AppScan Captures HTTP Traffic
AppScan can monitor traffic in your choice of three ways:
- Embedded browser (Chromium engine - try this first)
- Embedded browser (Internet Explorer engine - use as needed)
- As an HTTP proxy (as with Burp Suite: point your webapp client at it)
Use whichever of those works best with your targeted application. I suggest trying the embedded browsers first because they are more powerful (e.g. they can be told to execute JavaScript in responses).
Key Concept: Working with Results
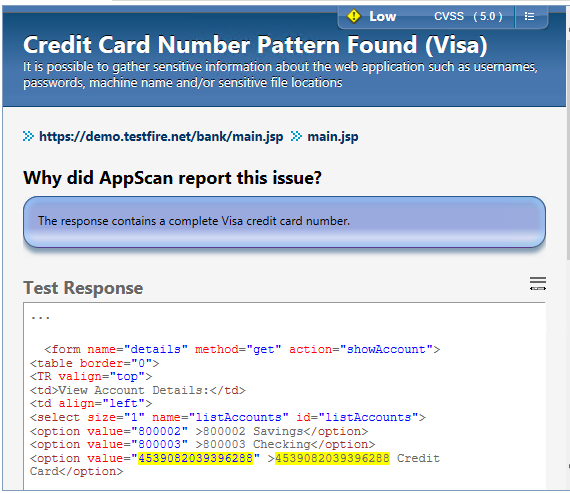
AppScan can create reports as Word or PDF documents. Do this and keep it among the test’s artifacts so we have a record of what was found, but don’t proactively give it to the customer. The reports are either very, very long or else they’re too short to be actionable. For example, the “detailed report” for the scan shown below (covering just two logged-in HTTP requests) is 65 pages long. It’s possible to create custom report templates, and we may do that, someday.
The best way to handle the results is to treat them as inputs for your pentest by reviewing them from inside AppScan itself. The details that AppScan shows when it finds an issue can make great screenshots for your report.
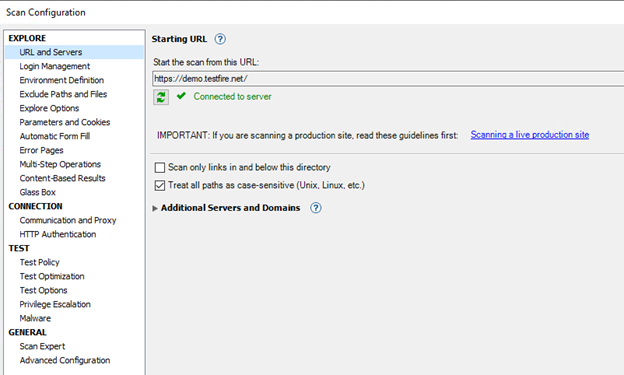
How to Configure a Scan
Understand the application you’re testing. Use a browser to log in and explore it a bit. Understand how authentication is handled (e.g. which cookies are used, whether there’s MFA involved [which … you can tell AppScan to prompt you for login during scans. This means you have to sit and watch the scan, of course, but it’s the only way I know of to get any kind of coverage from a scanner where this kind of MFA is involved])
Record the Login
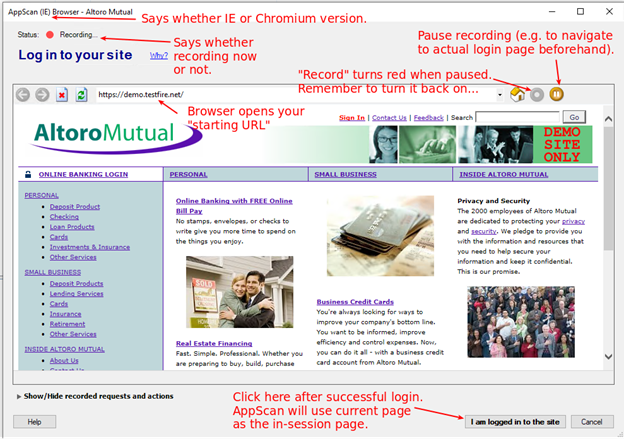
Once you know how the login works and how to explore the application after you’re logged in, you’re ready to begin in AppScan. When the wizard gets to that item, click the “record login” button, and then follow the steps you would follow to log in.
AND THEN STOP!
This is probably the mistake you’re most likely to make, even after years of using AppScan: you go to record the login and while you’re doing it, you forget that you’re just recording the login and you continue to browse the whole application. Stop yourself. Exploring is LATER. After you have the login recorded.
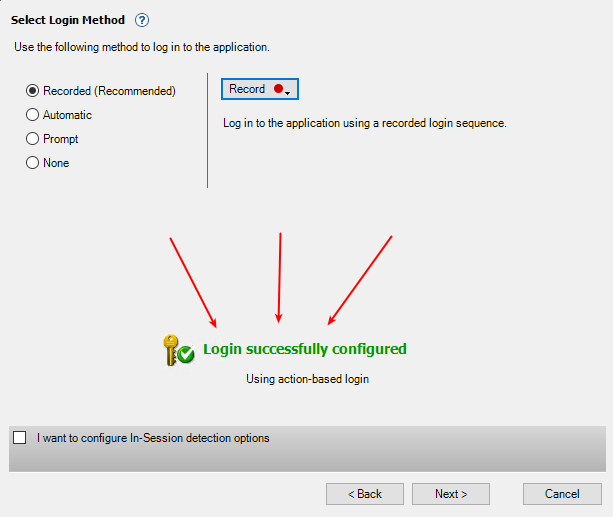
After you’ve recorded the login, AppScan will try to re-play it and see if it can identify a session. This will take a few minutes, and it may suggest some changes. If it doesn’t “just work,” you’ll have to help it along. This is where knowing how the login actually works pays off.
If there are requests in the login sequence that are not necessary (i.e. you can still get a valid session without them) you can delete them. This will save time during the scan: the login sequence may be re-played quite a lot, so the quicker it goes, the quicker the scan will go.
Identify the in-session page and pattern
AppScan will guess at one, but you should double-check it, even if AppScan’s choice works. This request will be sent thousands of times during the test, so you want a request that returns quickly. Find a page that (a) has something in it that’s reliably present when you’re logged in, and reliably absent when you’re not and (b) looks like it doesn’t require a lot of work or time on the server to render it.
Do a Manual Explore
The rule here is “visit every page and submit every form” that you want AppScan to test. Adjust the reality of that to match your understanding of the application, and basic logic. For example, don’t submit the “change my password” form because if AppScan does that during the test, the password in the login sequence will no longer be correct and the scan will fail. Don’t submit the “delete my account” form for pretty much the same reason.
Doing this manually ensures that you get a good set of HTTP requests and responses, and that you can control how much of the application AppScan actually tests. An “automatic explore” is a full spidering of the entire site and submission of every form with AppScan’s guess at what might be valid data for each input field. An “automatic explore” is too broad to complete in a reasonable amount of time, and it’s too dumb to be sure you’re testing with valid data.
SAVE THE EXPLORE DATA
You get one chance to do this: immediately after you finish the manual explore. Save the explore data now. It’ll be a text file with a .exd extension. This has two benefits:
- If you need to re-build the scan for any reason, you can just import this file instead of re-doing the manual explore.
- It can be a reference to confirm which areas of the application you covered.
This is your only opportunity to get at the explore data. Don’t forget to save it.
Configure Do Not Scan Items
If you find parts of the application that would be dangerous to scan or that would break things, configure AppScan to “do not test” them. You can do this by URL or by parameter name. Regular expressions are allowed, and AppScan has a few things built-in. As mentioned above, make sure that you don’t have it test things that would break the login. But also if there are parts of the application that would cause some other kind of trouble (like a form that sends email to a human for processing, or causes some physical action in the real world), you might want to exclude those, too.
Related: make sure that you tell AppScan to scan only the hosts that you have authorization to scan! Our license is not restricted by target, so you could scan the NSA if you wanted to (or if you weren’t paying attention). It’s easy to accidentally test systems that only supply content to the actual target site - third-party analytics or APIs are a common example.
Make sure that tests are sent only to systems you are authorized to test.
Run the Scan Test
Run “Test Only” - the “Scan” option will add a spidering step and all the complexity and time and confusion and inaccuracies that go along with that.
Available Items, Not Covered Yet
Traffic Viewer - when traffic logging is enabled in your scan, Traffic Viewer renders the HTTP traffic so you can diagnose problems or learn more about how it’s working. This should be on the taskbar, but it lives in C:\Program Files (x86)\IBM\AppScan Traffic Viewer\
API Scanning (OpenAPI / Swagger)
Tools > Extensions > Web Services Wizard (OpenAPI).
Fair warning: you have to know how the APIs work in order to use this: you’ll manually create flows (create some object, modify that object, retrieve the modified version).

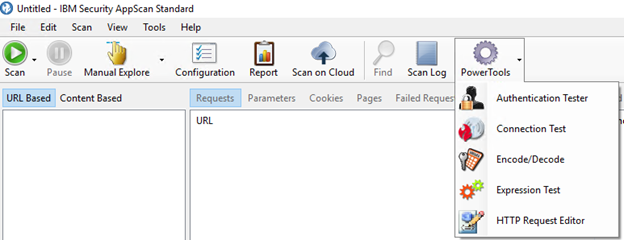
PowerTools
- Authentication Tester (helps w/ login sequence / in-session detection)
- Connection Test (sends HTTP rq to see if you can talk to whatever server)
- Encode/Decode (like Burp Decoder, but different translations including hashes and 3DES)
- Expression Test (give regex and text to search, it shows you what matches)
- HTTP Request Editor (send arbitrary HTTP requests, see responses)
That’s it, in summary. The section below shows screenshots for better context.
Screenshots: Basic Setup
The wizard should open when you open AppScan. If it doesn’t … File > New and choose a template.
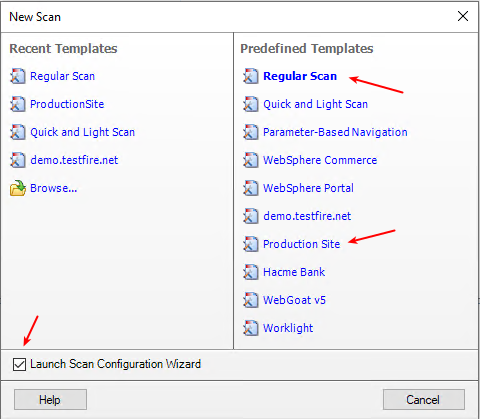 Suggested Choices (don’t agonize: you can change all of this before you run the scan)
 The tools needed for scanning by WSDL are not installed yet.
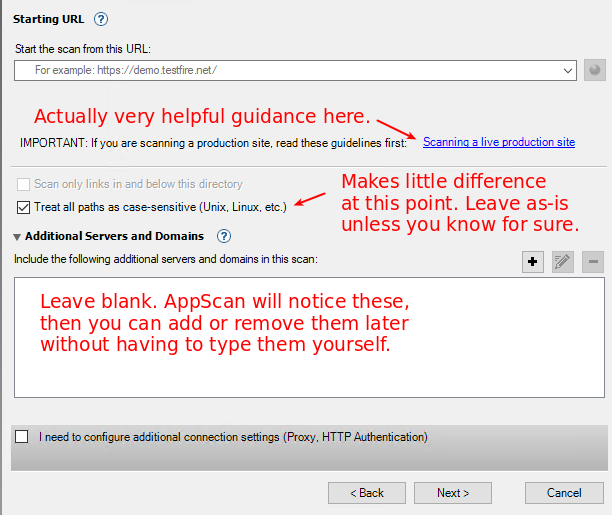 Fill in your starting URL - whatever page you want AppScan to load first.
 Click the “Record” button for a drop-down: choose IE browser or Chromium browser
 Embedded Browser: Initial view
(creds for AltoroMutual: jsmith/demo1234 - scan this site all you want for practice.)
Embedded Browser: Initial view
(creds for AltoroMutual: jsmith/demo1234 - scan this site all you want for practice.)
 After clicking “I am logged in to the site” AppScan re-plays the steps, then gives you this (if the re-play worked, ofc)
 Use “Production Site” if your site is in production. Use “Default” otherwise. Use another policy if you have good reason. “Complete” is great, but it takes a really long time to finish.
Maybe set up another small scan to test the login pages and areas you can get to without logging in.
Use “Production Site” if your site is in production. Use “Default” otherwise. Use another policy if you have good reason. “Complete” is great, but it takes a really long time to finish.
Maybe set up another small scan to test the login pages and areas you can get to without logging in.
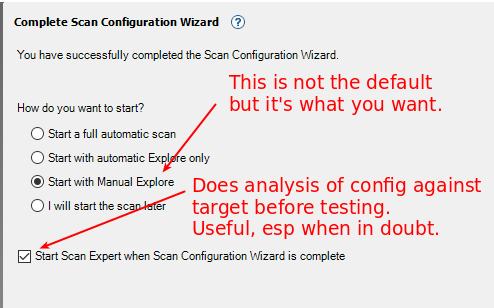 Default is “full automatic scan” (which will take forever and give unreliable results) and to omit the Scan Expert. Scan Expert costs you no more than 2 minutes during setup (there’s a timer), and can identify things that may cause trouble later. Recommended.
Upon clicking “Finish,” you get the embedded browser again. This is why it’s so easy to forget to stop when you’re recording the login sequence. It’s the same UI for both tasks.
Here you’re telling AppScan what the application’s “expected” traffic looks like. Everything you do here is input to the scanner, so every request you send is a request that will be tested (unless it matches some exclusion rule). If you get actual errors from the webapp during this recording, you can remove them from the “explore” data after you finish the browsing (if you take note of the URL where the error happened - you’ll have to find the request by scrolling through the list). Better to avoid errors altogether, but a perfect run is not required.
PAUSE the recorder while you log in (so that the login steps are not part of your “Explore” data). You can recover if you forget, but it’s better to just not forget up front.
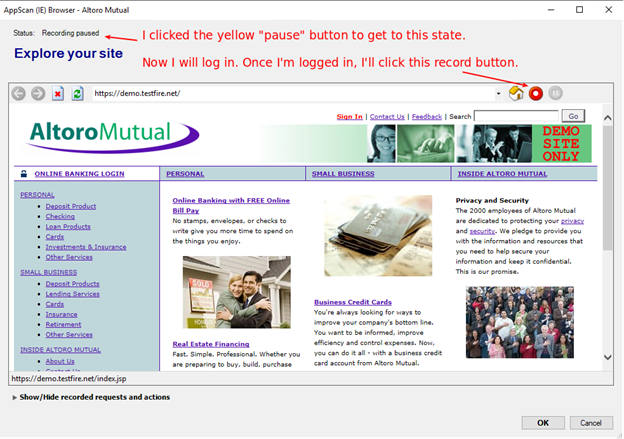 Recording PAUSED While I Log In
WARNINGS: Clicking the “OK” button at the bottom means you’re done recording. It’s easy to mistake that button for something in the app you’re browsing, so be careful.
Don’t forget to START THE RECORDING after you’re logged in. It’s very easy to forget that.
(It may be easier to just record everything, and then just delete the login requests afterwards)
Recording PAUSED While I Log In
WARNINGS: Clicking the “OK” button at the bottom means you’re done recording. It’s easy to mistake that button for something in the app you’re browsing, so be careful.
Don’t forget to START THE RECORDING after you’re logged in. It’s very easy to forget that.
(It may be easier to just record everything, and then just delete the login requests afterwards)
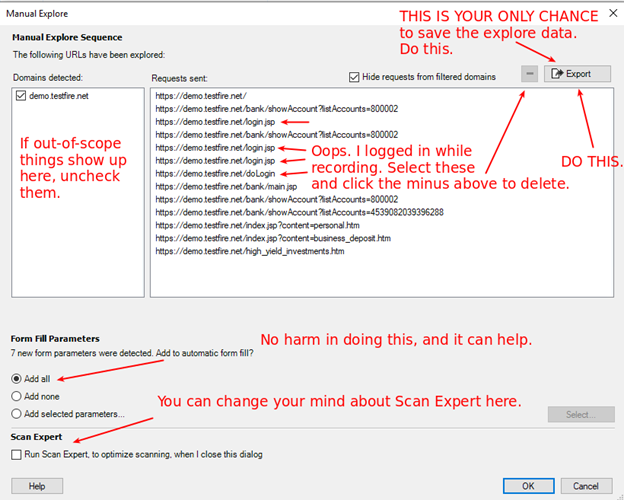 SAVE YOUR EXPLORE DATA NOW (it’s your only chance)
Delete any URLs you don’t want to scan.
Remove any domains that are not in scope.
SAVE YOUR EXPLORE DATA NOW (it’s your only chance)
Delete any URLs you don’t want to scan.
Remove any domains that are not in scope.
Clicking OK above starts the Scan Expert (if enabled) and also starts a thing AppScan calls “Scanning” (which is not the same thing as “testing).
 “Scanning” is repeating the login, checking that we’re “in-session,” and then following the explore steps. This is to make sure things still look the same when AppScan does it.
Your tests ARE NOT RUNNING YET and they won’t just start on their own. Don’t go away!
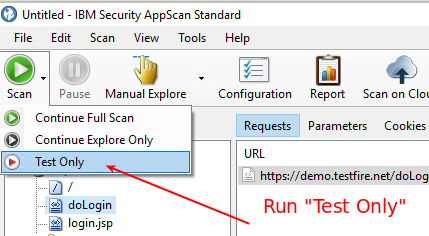 You want “Test Only”
Your “manual explore” covers the “Explore” phase, so that’s done.
The “full scan” is “exploring plus sending tests”
You want “Test Only”
Your “manual explore” covers the “Explore” phase, so that’s done.
The “full scan” is “exploring plus sending tests”
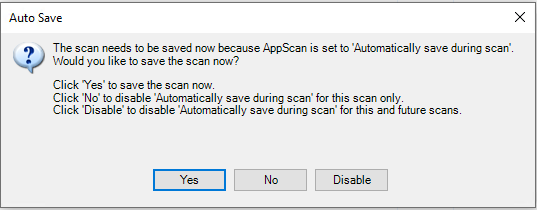 Click “Yes” and save the file with a Good Name in a Reasonable Place.
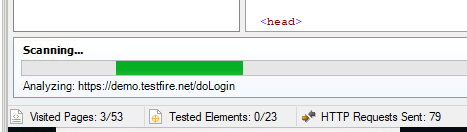
 Window when Test Begins. Note status items in the status bar at the bottom.
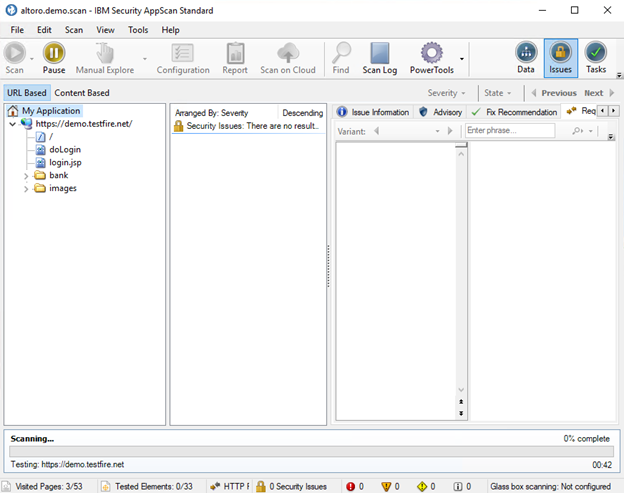
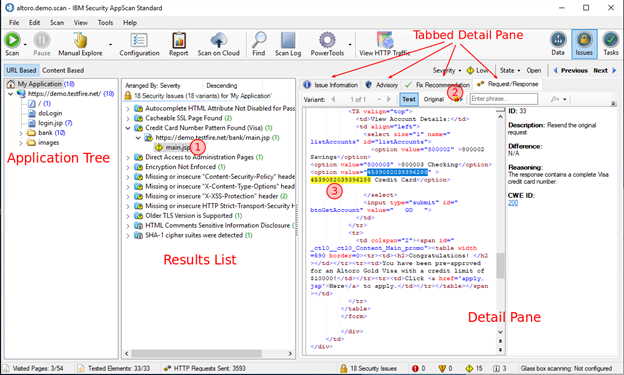 When test is done.
The numbers above show how to get to the details of any issue: “why did AppScan report this?”
When test is done.
The numbers above show how to get to the details of any issue: “why did AppScan report this?”
The “Issue Information” tab on the Detail Pane is a more customer-friendly summary of the same information.
 Issue Information tab of Detail Pane
Screenshots: Scan Config Options
The wizard that we followed above sets the key options and may be all you need to do. This section covers the full set of options and how to set or change them outside of the wizard.
 Scan Configuration Options
Login Management
- Login Tab: Same as wizard. Also allows import and export of saved login recordings.
- Review and Validate: Set in-session detection options (page and pattern) and switch between “Action-Based Login” (more intelligence) and “Request-Based Login” (less).
- Session IDs: Shows parameters and cookies seen during login. Allows setting of “tracked” or not.
- Advanced: Pattern for identifying “logout” pages (to avoid accidental logouts during the scan) and “always log out before logging in” and the number of times to attempt a login before giving up.
Environment Definition
- Identify (if known) the web server, app server, database and third-party components to optimize the scanning.
- Other settings affect issue severity calculations, so don’t waste time on those.
Exclude Paths and Files
Identify areas on the target domains that should not be tested. Specify one or more patterns to apply to URLs Specify any number of file types (by filename extension)
Explore Options
- Generally irrelevant, because you’re going to do a Manual Explore.
Parameters and Cookies
- Lists parameters and cookies noticed by AppScan.
- Also allows entry of “Custom Parameters” (e.g. those not in a query string or query string-formatted POST data).
Automatic Form Fill
- Like the “Peter Winter” section in Burp Suite.
- Auto-populates with things from the Manual Explore
- Otherwise not relevant unless you do an Automatic Explore.
Error Pages
- Collection of expressions that identify errors that arrive with HTTP 200. If your webapp returns error messages under HTTP 200, identify those error pages here, to avoid false-positives.
Multi-Step Operations
- When a webapp makes you follow a series of steps in order, you can’t just test them all in isolation. You need to submit a normal step 1, then a normal step 2 before submitting an altered step 3. That’s a “multi-step operation” and here is where you set those up.
- There’s a practical limit to the number of steps, here.
- Testing of Multi-Step Operations is done separately from the rest of the webapp.
- Check the online help for details or ask BBKing for help.
Content-Based Results
- “Normal” webapps have different URLs for different functions.
- Single Page Apps don’t.
- On this pane, you can define rules so that results from a single-page app are broken out into their functional areas.
Glass Box
- You can put an agent on the server running the webapp you’re testing and use it to gather more information about what’s actually happening on the server.
- We’re unlikely to use this.
Communication and Proxy
- Define how many threads to use for testing.
- Define timeouts - how long to wait for a given HTTP response before moving on.
- Define overall rate limits
- Tell AppScan itself to use a proxy or not
HTTP Authentication
- Define credentials for..
- HTTP Basic Auth
- NTLM
- Kerberos
- Add a client certificate for apps that need one.
- Wouldn’t it be cool if you could put in a TOTP seed here?
Test Policy
- Defines what tests to run.
- You can get super-granular here.
- We may want to come up with a policy or two of our own for different kinds of tests
- For now, use the “Default” or the “Production” options.
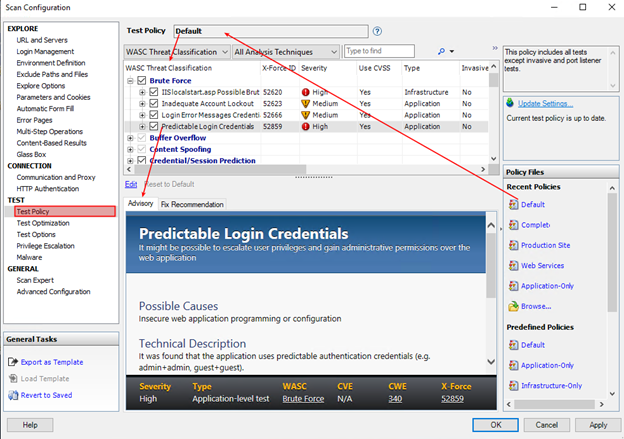 Test Policy Configuration
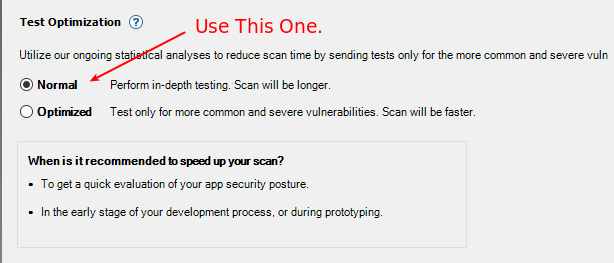
Test Optimization
- Same as seen in the wizard
Test Options
- Use Adaptive Testing (to identify and filter out “unnecessary tests”) Allow multi-phase scanning (i.e. scan again based on things found during initial scan)
- Send tests on login pages / logout pages
- Enable Javascript Security Analysis (static analysis of Javascript for security issues)
- Apply previous ‘noise’ classifications to this scan.
- “Noise” is AppScan-ese for “false positive” - you can mark issues as “noise” and they fall out of the default views in the current scan and in any future scan by the same instance of AppScan.
- Classification is based on {URL, Parameter, Issue Type}
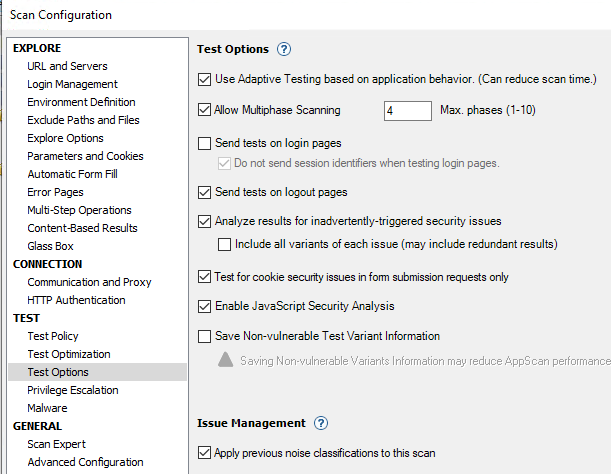 Test Options
Privilege Escalation
- Run several scans at different privilege levels.
- Point AppScan at the other levels here, and it automates privilege escalation tests.
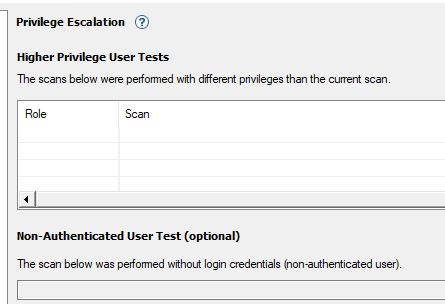 Privilege Escalation Options
Malware
- “Check for links to malicious external websites”
- Enabled by default, and entirely passive.
Scan Expert
- Configure parameters for the Scan Expert to analyze the scan configuration.
- Max number of pages to look at
- AND
- Max amount of time to spend (in minutes)
Advanced Configuration
- Kind of like Firefox’s about:config - a list of parameter names and values that you can mess with.
- Don’t mess with these too much unless you know for sure what it’s gonna do.
Thus ends the instructions and references for testers. The rest of this is admin stuff and raw notes from the installation.
Installation Notes
STOP READING HERE, TESTER. You don’t need this part unless you’re reinstalling AppScan.
Key Installation Concepts
We have two “Floating User Licenses.” This means that at any one time, two people can be using AppScan. To manage this, AppScan uses a FlexLM license server. We load our two licenses there. When AppScan starts up, it will be pointed at this system. If a license is available, AppScan will check it out and continue. If not, it will tell you, and then load in “demo” mode (wherein you cannot start new scans, but I think you can view existing scan results).
IMPORTANT: If the license server does not have any license file at all, it seems, it will crash on startup. So that’s curious.