Privilege Separation Testing with Autorize
- Introduction
- Configuration (tl;dr - this section covers the main concept)
- Sample Usage
- Analyzing Results
- Troubleshooting
- Installation
Introduction
Use Autorize to automatically replay requests with varying privilge levels while you navigate an application.
From the GitHub page (https://github.com/PortSwigger/autorize) - “Autorize is an automatic authorization enforcement detection extension for Burp Suite. It was written in Python by Barak Tawily, an application security expert. Autorize was designed to help security testers by performing automatic authorization tests. With the last release now Autorize also perform automatic authentication tests.”
Configuration
Configuring Autorize can be challenging. However, dialing in your Autorize configuration to reduce noise (i.e. requets you don’t care about) and false positives is well worth your time. A simple strategy for configuring Autorize is as follows:
- Log in as a low privileged user and save that session token in Autorize.
- Add “Interception Filters” so that Autorize only tests the resources you’re interested in. The “Scope Items Only” filter is a good starting point.
- Keep the lower privileged session alive and create another login session as a higher-privileged user.
- Start navigating the app in your browser using the higher-privileged session.
- Autorize re-submits every request it sees twice and compares the responses:
- Once with the lower-privileged user’s session ID
- Once with no session ID
- Autorize re-submits every request it sees twice and compares the responses:
- Review the Autorize results table. If there isn’t a lot of noise or false positives, drive on. Otherwise, adjust your Autorize config to further limit what it tests.
Sample Usage
The following demo shows how to implement this strategy, using the HCL AppScan demo site, http://demo.testfire.net.
Lower Privileged User Credentials: jsmith:demo1234 Administrative User Credentials: admin:admin
Save a “Lower Privileged” Session Token in Autorize
There’s a couple of ways you can save a “lower privileged” token in Autorize:
- Manually copy the session token into Autorize
- Use Autorize to fetch a Cookie or Authorization header from the last request seen by Burp
I tend to use the manual approach because then I know exactly where the session token came from. From the “HTTP history” tab, pick a request where a session token is being sent to the application and select the entire Cookie header.
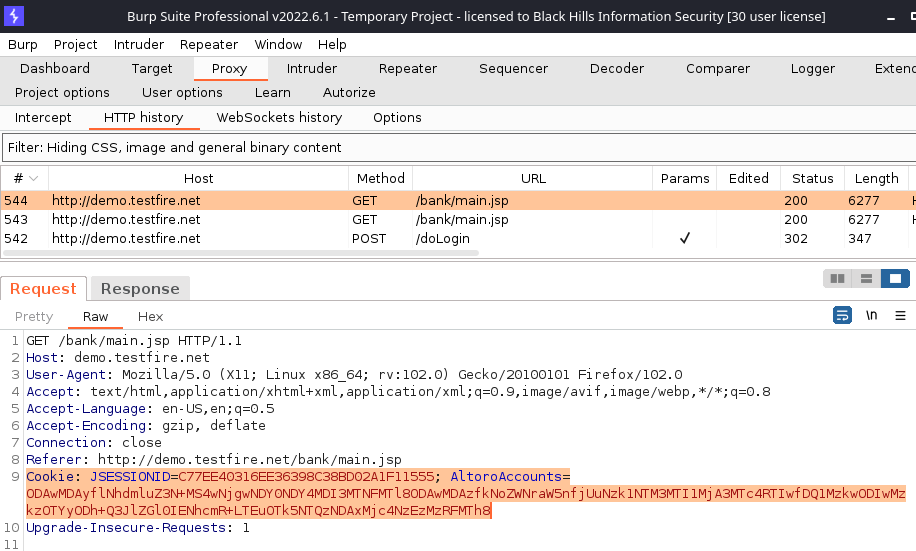
Copy the Cookie header and navigate to “Autorize” → “Configuration”. Near the top is an empty box. Paste the Cookie header into that box.
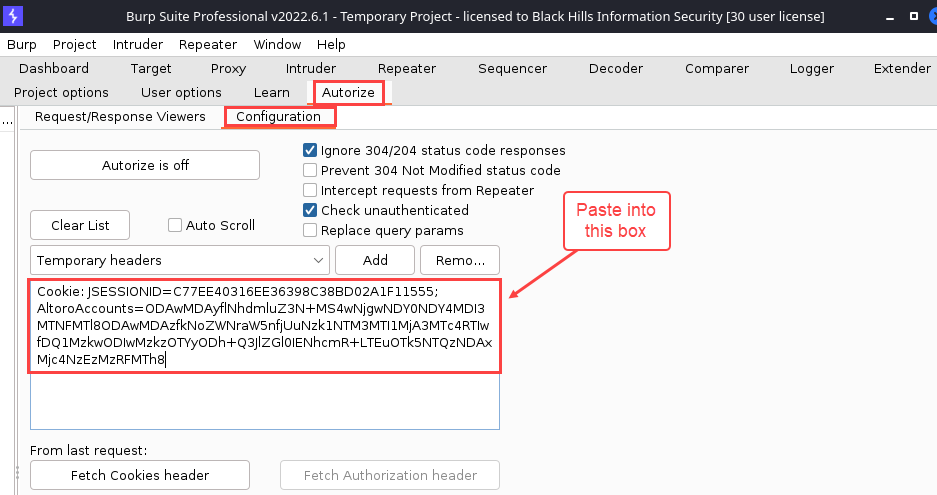
As mentioned earlier, there’s a “Fetch Cookies header from last request” button which can be seen in the figure above. Since you’ll be logged in as an administrative user, though, this is probably not what you want.
Add Interception Filters
Autorize uses “Interception Filters” to reduce noise (traffic that you’re not interested in analyzing). A default filter that Autorize suggests is “Scope items only,” for example.
The following demo shows how to apply the “Scope items only” interception filter. For this filter, in particular, you’ll want to make sure that you are satisfied with your scope definition before adding it. Otherwise, you will miss a lot of your traffic. See General Usage of Burp Suite on how for set scope in Burp Suite.
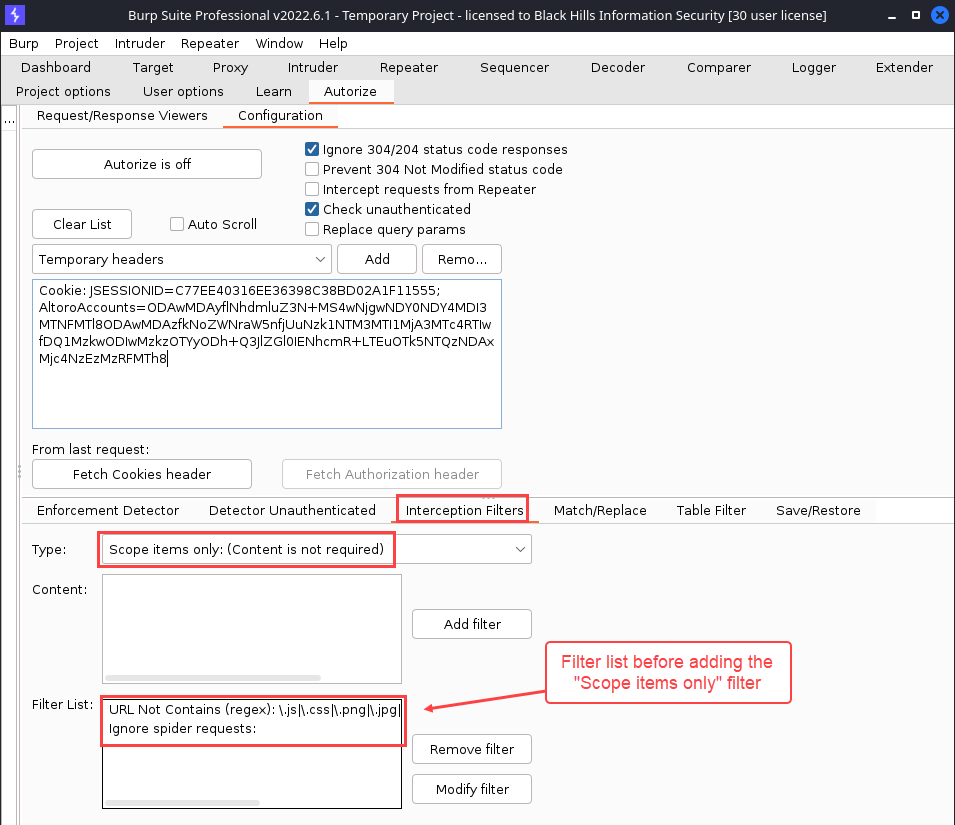
Here’s what the “Interception Filters” menu will look like before anything has been configured.
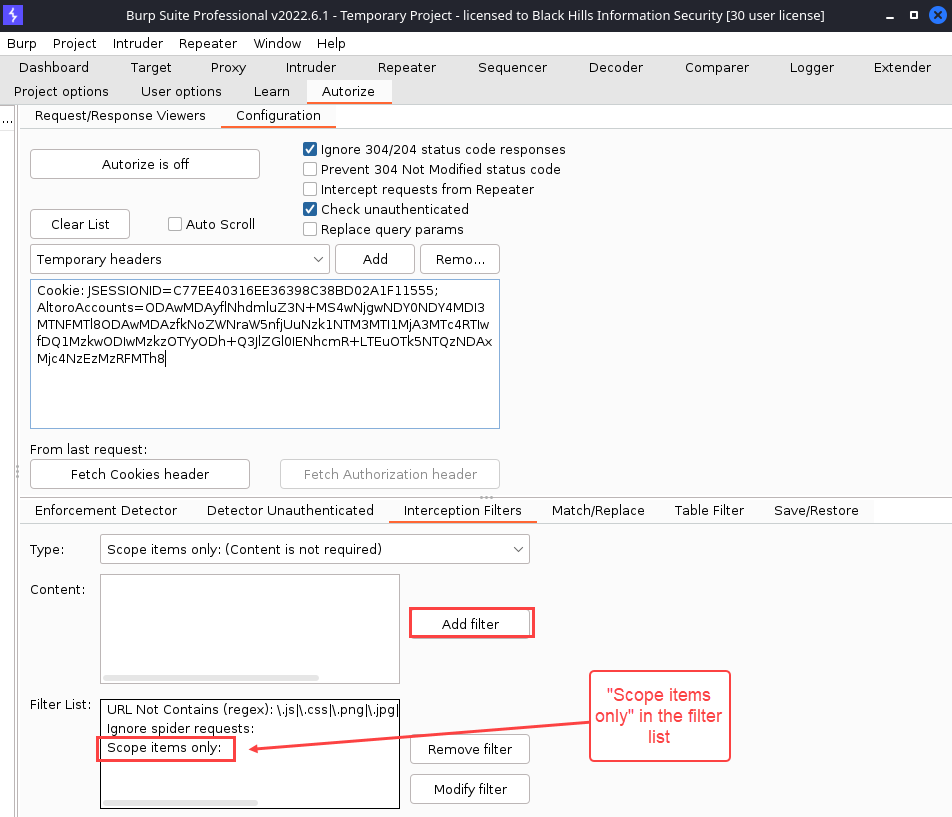
To add the “Scope items only” interception filter, click the “Add filter” button. After doing so, your “Filter List” will look ilke this.
Turn on Autorize and Log in as a High-Privileged User
IMPORTANT: Do not log out as the lower privileged user. This should invalidate your lower privileged session token if it does, it will lead to false negatives. Of course, if it doesn’t…you’ve probably got yourself an “Improper Session Management” finding. :)
You can keep that lower-privileged session alive by keeping it active in a different browser or browser profile. If you want to use one browser for all of the testing, you can also do it by simply deleting your browser history and cookies.
After you are logged in as the higher-privileged user, it’s time to fire up Autorize. Back in the “Autorize” → “Configuration” tab, click the button that says “Autorize is off”. It will turn blue and say “Autorize is on”.
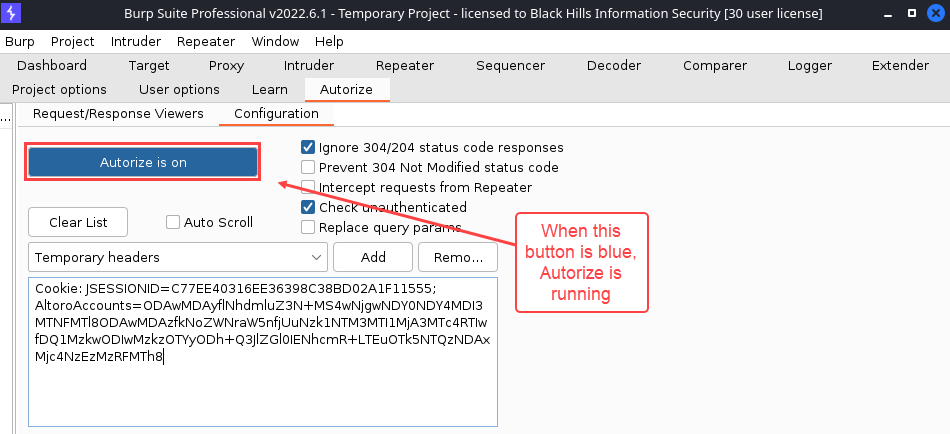
So, what exactly is going on while Autorize is running?
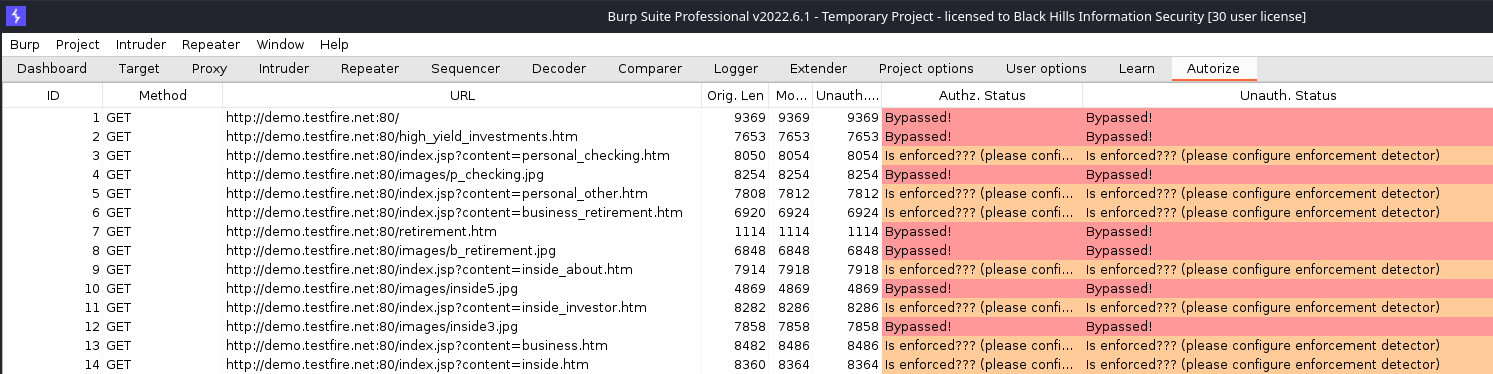
For every request that Burp Suite sees, Autorize will replay it twice. The first replay will use the Cookie header that was copied into the Autorize configuration tab - the lower-privileged user. The second replay will simply omit the Cookie header entirely to simulate an unauthenticated request. Here’s what the Autorize results table looks like after navigating the application as an adminstrative user.
Analyzing Results
After generating some traffic, one of the quickest ways to surface potential authorization vulnerabilities is to sort based on status. Possible status codes are:
- “Bypassed!”: This status will be highlighted in red and it means that the response to the replayed request was identical to the original response.
- “Is enforced???…”: This status will be highlighted in orange and it means that the replayed response was similar to the original response.
- “Enforced”: This status will be highlighted in green and it means that the replayed response was completely different or it had a status code indicating that the request was not authorized.
To sort, click the column header for the column that you wish to sort on. In the following example, I sorted on the “Authz. Status” to group all the requests with a “Bypassed!” status. This would show me potential privilege escalation problems: the response for my lower-privileged session token was identical to the higher-privileged request.
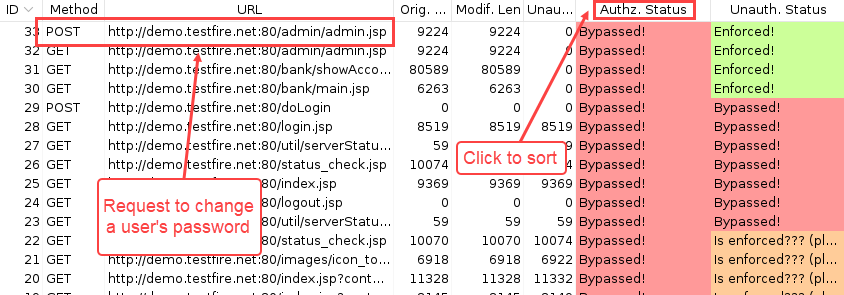
The top request that is highlighted in the figure above was initiated when changing the password on the “admin” account. From looking at the “Authz. Status” column, we can see that the response was identical. This would be a very good request to manually review and see if it was possible to change password on the “admin” account while logged in as the lower privileged user, “jsmith”. A password change function should never be replayable like this.
Troubleshooting
So, if you worked ahead without reading this section, your results table might look different thatn the results table in the preceding figure. I had to make a small change which I’ll cover in this section to produce the results table pictured above. Here’s what my results table looked like inititally after navigating the application as an adminstrative user.
 The thing that seemed off was I thought I clicked 15 - 20 links, but only saw three requests in my Autorize results table. I verfied that there were more than three requets sent, by looking at my Burp History tab.
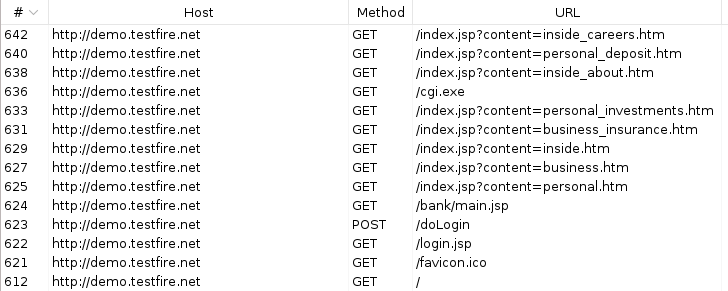
Looks like Burp saw 14 requests, so why did Autorize only see three? The first thing to check in a situation like this is your interception filter list since that is how Autorize decides what to replay and what to ignore. The first filter is a regex match for file extensions in URLs looks like it might be the problem.
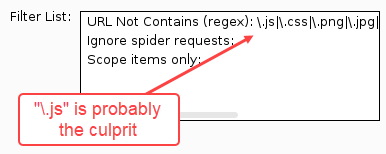
In the Burp History tab, we could see that most of the URLs matched that pattern as they included references Java Server Page files, that had a “.jsp” file extension. To see if this was the offending rule, I turned off Autorize and disabled the “URL Not Contains (regex)” filter be selecting it and clicking the “Remove filter” button. After removing the filter, I navigated the application again and saw more traffic.
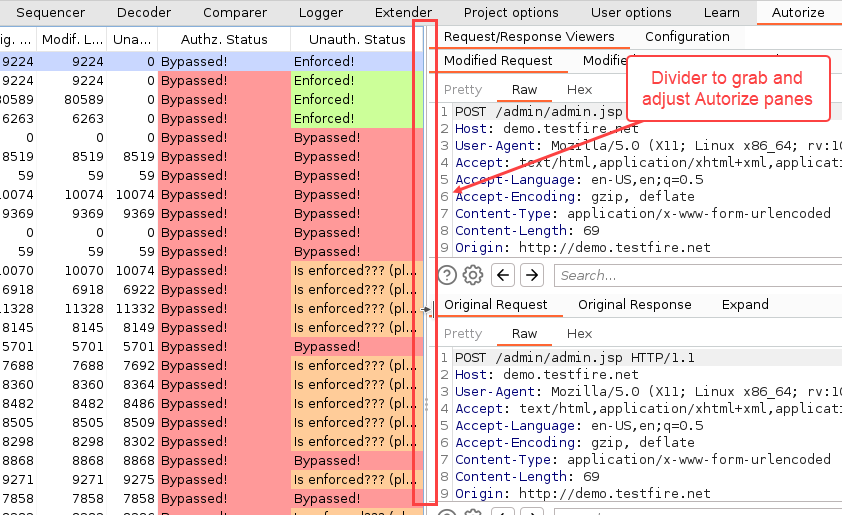
Side note: There’s a divider that you can grab and slide with your mouse to see the results or configuration table in Autorize
Note: The URL that Autorize uses here has a bug in it. It only anchors the .ico extension to the end of the URL. All the other ones match a URL that contains the string, not just one that ends with the string. The fix is to put parens around the list of extensions and leave the $ out of it. There’s a PR to fix it at https://github.com/Quitten/Autorize/pull/100
But you can do it yourself, too: this is the simplest corrected regex:
(\.js|\.css|\.png|\.jpg|\.svg|\.jpeg|\.gif|\.woff|\.map|\.bmp|\.ico)$
Installation
Autorize is in the Burp Suite’s BApp store, so installing is the same as for any standard Extension. It’s written in Python, so you’ll need to have Jython Standalone on your system and configured with Burp’s Extender > Options > Python Environment area.
With Burp Suite open, perform the following steps:
- Navigate to “Extender” → “BApp Store”
- Type “autorize” in the search box
- Select “Autorize” from the list on the left
- Click the “Install” button
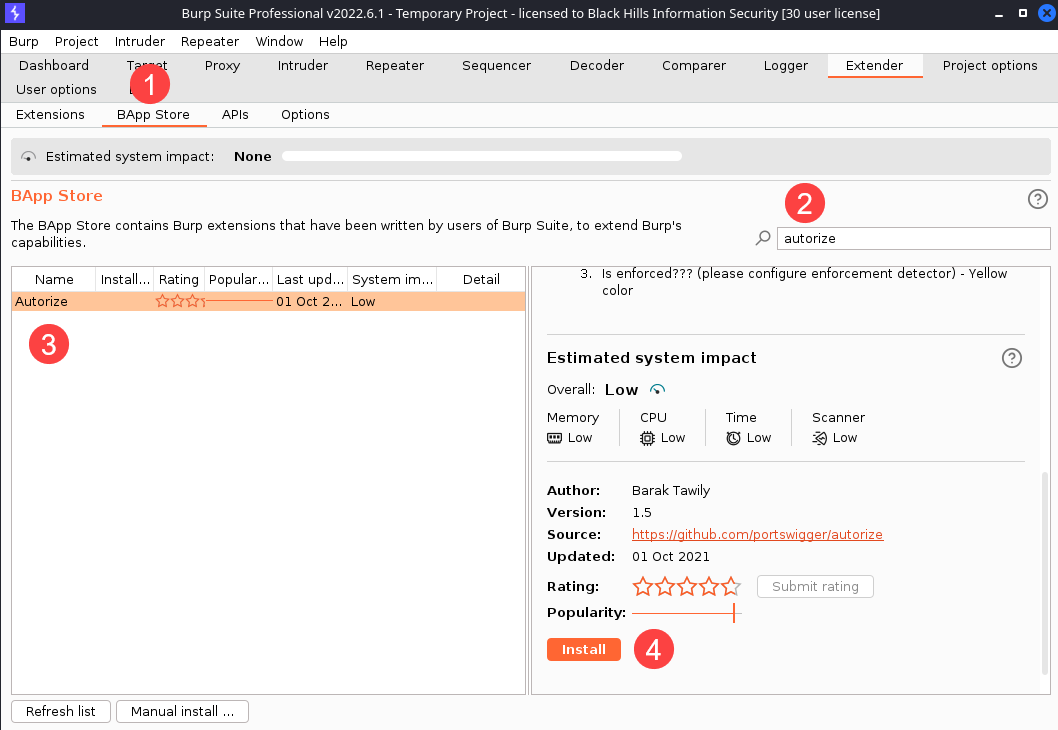
If all went well, you should see an “Autorize” tab.
